Turtle Sticking Out
Isolate Turtle
Click on the photo below and copy the full-size image into a new PS document (1500x1000px).


Rename the layer to “sand”.

Go to the Properties tab and Select Subject…

When the turtle is selected, CTRL+J to copy it into a new layer.

Rename the layer “turtle”.

Unlock the Background layer and delete it.

Sand
Make the sand layer active.

Select the Rectangle Marquee Tool.

Click and drag starting outside from the top left corner and drag the opposite direction to the edge of the sand. When you let go, you should have something like this…

Delete. Then Deselect to get rid of the dotted outline.

Your layers should look like this…


Surface
Make the turtle layer active…

Click on the photo below and copy the full-size image into the document…

Select the Rectangle Marquee tool again and select the sky area…

Delete it and Deselect to get rid of the dotted outline.


Rename the layer “surface”.

Use the Rectangle Marquee tool and select the bottom area like this (to include the yellow light reflection)…

Delete this as well, then Deselect.


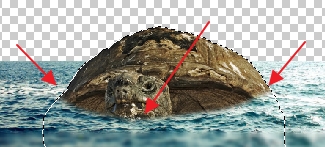
CTRL+T to transform. Drag the middle handles up so it’s above the head and just above the top of the legs like this.

Then click Done.

If it changes the width as well, go to the Options bar and unselect the lock icon that’s keeping it proportional…
Blurred Edge
Use the Rectangle Marquee tool again to select the bottom area, about this size…

CTRL+J to put it into a new layer. Rename it “blurred edge”.

Then go to Filter > Blur > Gaussian Blur … set the amount to “5”.


CTRL+T the layer and tap the down arrow 2-3 times so you have a nice soft edge; you may also need make it smaller.

Click on Done and you should have something like this…

Mask
Select the surface layer.

Add a layer mask.


CTRL+click on the turtle layer to get the turtle area selected.


Take the Brush Tool, make it about size 100-150, softness about 50%. Make sure that the foreground color is black.


Make sure the mask is still active and paint in an angled area like this…

CTRL+D to deselect and get rid of the dotted outline. You should have this…

Underwater
Click on the photo below and copy the full-size underwater photo and paste it into your document.

Rename the layer “water” and move it to the bottom…

Use the Rectangle Marquee tool to select from outside the top-left of the canvas, down to below the turtle’s head, just above the blurred surface edge, like this…

Delete, then Deselect.

It should look like this…

Sand Edge
Add a layer mask to the sand layer.

Select the Brush tool. Bring down the softness.

Brush along the edge of the sand from one side to the other…


Foot Splash
Select the turtle layer and add a new layer above it, rename it “foot splash”.


Select the Brush tool. Then go to the Brushes panel and expand Underwater Turtle and go into the Splashes folder.

Make sure your color is white. Try out some of the splashes

- use [ and ] brackets to make the brush smaller or bigger
- click to add a brush, CTRL+Z to undo and try another one until you find one you like.

Reset the Brush tool to the default.

See through the water
Make a copy of the water layer using CTRL+J. Then move the original water layer up to just below surface.


Select the top water layer and add a layer mask.

Set the color back to black. Select the Brush tool – make it soft and size 500px.

Also reduce the opacity to 50%.

Make sure you are on the mask part of the layer and click the brush a few times so can see the legs and the splash…


Reset the Brush tool to the default.
Sky
Click on the photo below and copy the full-size image into your document.

Paste it in and CTRL+T to resize/move to the top.

Move the layer to the bottom, rename it “sky”.


Island
Trees
Copy the picture below into PS
Make sure it’s at the top, rename the layer to “trees”.

CTRL+T to move it up so the bottom edges line up with the turtle’s head.
Do not change the size!

Make sure to click on Done. Then add a mask to the layer.

Select the Brush tool, make it about size 120-150 px and totally soft.

With the mask active, brush out the bottom (not the sides) of the trees so it blends with the turtle’s shell like this…


Get it checked so far before continuing…

Rocks
Copy the image below into PS.
Rename the layer “rocky”. Make sure it’s at the top.

CTRL+T and move it so it’s over the turtle’s head like this. Then click on Done.

Add a layer mask.

Select the Brush tool again, and brush around all the edges to get something like this…


Waterfalls
Add a new layer at the top, rename it “waterfalls”.

Switch colors so white is the foreground color. Select the Brush tool. Go to the Brushes panel on the top-right; expand the Waterfalls folder.


Choose one of the brushes in the Staggered folder. Use the [ and ] brackets to make it a good size and then click to place one like this.

You can do one big one or 2 or the thinner ones on the right…


Choose one of the brushes from the Straight folder and size it using the square brackets [ and ], then click to the left of the turtle’s head…


Reduce the opacity of the layer to about 80%.


Curves
Add an adjustment layer … Curves


Drag the black & white sliders inwards a little bit like this…

And you’re done.

