Getting Started
Copy the full-size picture below.

Create a new PS document (800 x 600 px)
Use the Rectangle tool…

- Set the Fill to a white
- Set the Stroke to a light grey, 15 pixels thickness.

Click and drag out a rectangle about this size…

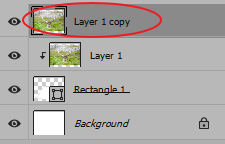
You will see the layer like this…

Clipping Mask
Select the photo layer and move it above the Rectangle layer…


Hover between the photo and rectangle layers, holding ALT. When you see the arrow, left-click. It should then have the arrow on the left…


… and your photo should be clipped by the rectangle shape.

Transform Rectangle
Select the Rectangle layer….

CTRL+T to transform … then right-click > Perspective.
Push in the top square to the left until it’s at the antlers…

Right-click on the rectangle again, this time choose Warp.

Push in the top and sides and pull down the bottom like this…

[Enter] or click on Done to apply the transformation.

Sticking Out
Select the photo layer and duplicate it (CTRL+J).
Go to the Properties tab on the top-right and click on Remove Background.

This adds a layer mask with the background painted out for you.


Select the rectangle layer again, and CTRL+T > Scale

Push down the top a bit so we have a good amount of the antlers sticking out.

Style
Select all the layers except the white Background layer (SHIFT-click).

Then CTRL+G to group them…

With the folder selected, add layer style… choose Drop Shadow

Reset to default and increase the opacity to about 60, increase the size to about 30, and change the angle to top-left.


You will see the style on the folder…

You can adjust the size of the rectangle more if needed.