Getting Started
Click on the photo below; copy the full-size picture (1000 x 585).

Create a new PS document (CTRL+N) and paste it (CTRL+V).

Save the file (CTRL+S) and name it “postcard”.
Smart Object
Double-click on the layer name and rename it “photo”.

Unlock the Background layer.

Delete it.

Select the photo layer and go to more layer options … choose Convert to Smart Object.

You should now see the smart object icon on the layer thumbnail.

Filter Gallery: Dry Brush
Go to the Filter menu and choose Filter Gallery.

Under Artistic, choose Dry Brush: (4, 0, 1)


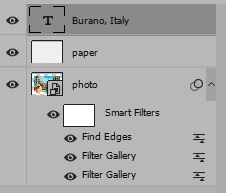
You will see the smart filter show up in the Layers panel.

Filter Gallery: Cutout
Go to the Filter menu and choose Filter Gallery.
Under Artistic, choose Cutout (8, 0, 1).


You will see a 2nd smart filter in the Layers panel.

Filter: Find Edges
Go to Filter > Stylize > Find Edges…

Double-click on the sliders on the right-side of the Smart Filter in the Layers panel.

Change the filter blend mode to Multiply and reduce opacity to 70%.


Paper Texture
Click on the photo below and copy the full-size image…

Paste it (CTRL+V).

Change the layer name to ‘paper’.

Go to Image > Reveal all…


Change the layer blend mode to Multiply.


Select the Move Tool – make the photo layer active.


Move the photo so you have a small edge at the top and sides like this…

Change Photo
Double-click on the smart object icon on the photo layer.
This opens the PSB linked file.

Click on one of the photos below and copy it.


Paste it in the PSB file.

You will see * in the file tab. CTRL+S to save the file.

This updates the main file. Go back to that tab to see the updated results.

Text
Select the Text tool.

In the Options bar at the top, change the font type to “Comic Sans“, size 150, color black.

Click in the middle of the photo to start. This will create a text box with some text.

Type a description that matches your picture…
- “Santorini, Greece” or just “Santorini”
- “Yacht Racing”
- “Tropical Beach”
- “Switzerland”

Click off in an empty area in the layers; the layer name will then be the words you typed.

Select the text layer and CTRL+T.
Move the text layer down and squish & stretch it to fit the edges of the painting and still have room below like this…

[Enter] to apply the transformation.

Here are the other pictures/examples:


Get your project checked off.
