Getting Started
Start by typing out the page heading “Top Songs: 1980” and [Enter] to the next line.

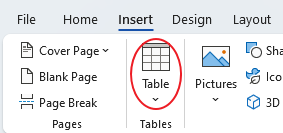
Go to the Insert tab and add a Table … 3×6.

In the first row add “Artists” and “Songs” for the row headings, and in the first column add numbers 1-5 as shown below…

Add Songs
Choose Year
Option #1: follow my example, 1980 songs
- Air Supply – “All Out of Love”
- Barbra Streisand – “Woman in Love”
- Billy Joel – “It’s Still Rock and Roll To Me”
- Blondie – “Call Me”
- Christopher Cross – “Sailing”
- Diana Ross – “Upside Down”
- KC & The Sunshine Band – “Please Don’t Go”
- Kenny Rogers – “Lady”
- Lipps Inc – “Funkytown”
- Neil Diamond – “Love on the Rocks”
- Olivia Newton John – “Magic”
- Pink Floyd – “Another Brick in the Wall, Part 2”
- Queen – “Crazy Little Thing Called Love”
- Queen – “Another One Bites the Dust”
- Rupert Holmes – “Escape (The Pina Colada Song)”
Option #2: choose a different year
Click on any year below. This will open an info page with the top songs from that year at the top. Scroll down to see the list of songs…
If you want to do another year, use the navigation bar at the top to go to that page…

At the top of your starting document, change “1980” to the year you are focusing on.

Copy Song Text
Choose any 5 songs in any order you like from the year info page. Select the singer and copy into the “Artists” column; select the song and copy into the “Songs” column.


Select everything on the page (CTRL+A) and Clear Formatting.
Format Text
Default Font
Select the entire page (CTRL+A) and set the default font to Courier New, size 20.
- If any of the songs are more than 4 lines, reduce the font size for that song name down to 14.


Page Heading
Select the page heading and set the font type to Agent Orange and size 36.


Table Headings
- Select the first row and set the font type to Agent Orange, size 24.
- Select the first column and set to Agent Orange, size 36.
You should now have something like this…


Column Widths
- Click in the 1st column.
- Go to the Table Layout tab and set the width to 1.3″


- Click in the 2nd column; set width to 2.6″


- Click in the 3rd column; set width to 2.6″

Your table should now look like this…

Row Heights
Select just the song rows from #1 to #5… then set the row height to 1.4″


Spacing
Now make sure you are seeing the Ruler. If not, go to VIEW>… and check the box for Ruler.

Bottom Margin
Hover over the Ruler where the margin stars (white/grey), when you get a 2-pointed arrow and it says Bottom Margin, pull down to the 1/2″ mark.


Paragraph Spacing
- Select all the text on the page (CTRL+A) and go to the Layout tab.
- In the Paragraph section, set the Spacing to 6pt before & after.


Table Style
Select the table. Then go to the Table Design tab and go to the drop-down menu for styles. Choose any of these styles…


The top row should be dark and the others alternating like this…


Bold
Unbold
- Select the table.
- On the Home tab, click on the bold button so it’s not selected.

So the first row and the numbers should not be bold…


Singers: bold
Select the singers in the 2nd column and make them bold.


Cell Alignment
Select the table and go to Table Layout > Alignment… set the cell alignment to middle-middle.


Page Heading Font Color
Select the page heading.

Make it the same dark color as your table…


And you’re done…
